Creating MS Office Add-Ins with JavaScript: An Introduction
Learn how to create custom MS Office add-ins using JavaScript and Office.js in this beginner’s tutorial
Whether you work in finance, writing, programming, or any other profession, it’s likely that you’ve used MS Office at some point, perhaps even on a daily basis. You may have even created VBA Macros yourself for increased productivity.
But did you know that you can now run JavaScript code in MS Office applications and build Office add-ins using JavaScript? It’s pretty cool because this means you can run any web app in the Office environment with seamless integration and utilize all of the Office functionalities. This has opened so many new possibilities. All thanks to Office.js!
In this series of JavaScript tutorials, we’ll embark on a journey to build a fully functional MS Office Add-in that can grab photos from Unsplash (check out my Unsplash API tutorial) and seamlessly insert them into your documents while giving proper attribution to the original photographer.
In this tutorial, I’ll walk you through the process of setting up the project and building an MS Word "hello world" add-in, so that we can build upon it and improve it in the following tutorials. So, without further ado, let’s get started!
Prerequisites
- Familiarity with the JavaScript programming language
- Basic knowledge of web development
- Node.js installed on your computer
How Office Add-in Works Behind the Scenes
An Office Add-in is made up of two basic parts: an XML manifest file and your own web application. The manifest file is where you define all kinds of settings that dictate how your add-in will integrate with Office clients.
On the other hand, your web application is where all the fun stuff happens! This is where you write the code that makes your add-in do what it’s supposed to do. But, in order for it to work, you’ll need to host it on a web server. That way, it’s accessible to everyone who wants to use your add-in.

You can also configure your Office Add-in to work with localhost, you can test your add-in during development this way or simply use it for your personal workflow without sharing it with others.
Project Setup
I highly recommend to use the Yeoman Generator for Office Add-ins, also known as “Yo Office” to setup our Add-in. It can create a basic ‘Hello, World’ web application that is already connected to the corresponding manifest.xml file using CLI tools. Let’s explore how we can do this.
// Install Yeoman Generator for Office Add-ins

npm install -g yo generator-office
After installing Yo Office, navigate to the folder where you want to create the project, and then run the following command in your terminal:
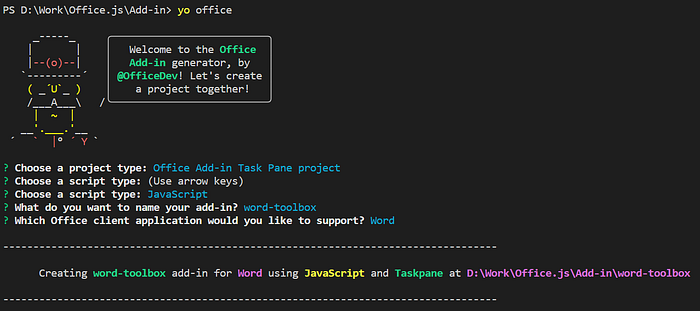
yo officeWhen you run the ‘yo office’ command, you’ll be prompted to provide project information. Choose the option that is appropriate for you, and you can see my selections in the screenshot below:
After the generator completes its task, you can navigate to your new project folder using the ‘cd’ command.
The manifest.xml file contains all the setup information, and the default add-in’s source location is set to localhost:3000/taskpane.html. We’ll need to change this URL when we eventually host our app on a server.
<SourceLocation DefaultValue="https://localhost:3000/taskpane.html"/>Next up, let’s navigate to the src/taskpane/taskpane.html file and open it in our code editor. Replace the existing HTML code with the code below which adds Bootstrap to our project.
<!-- taskpane.html -->

<!DOCTYPE html>
<html>
  <head>
    <meta charset="UTF-8" />
    <meta http-equiv="X-UA-Compatible" content="IE=Edge" />
    <meta name="viewport" content="width=device-width, initial-scale=1" />
    <title>Word-Toolbox</title>
    <script type="text/javascript" src="https://appsforoffice.microsoft.com/lib/1.1/hosted/office.js"></script>
    <link
      href="https://cdn.jsdelivr.net/npm/bootstrap@5.2.3/dist/css/bootstrap.min.css"
      rel="stylesheet"
      integrity="sha384-rbsA2VBKQhggwzxH7pPCaAqO46MgnOM80zW1RWuH61DGLwZJEdK2Kadq2F9CUG65"
      crossorigin="anonymous"
    />
    <link href="taskpane.css" rel="stylesheet" type="text/css" />
  </head>
  <body>
    <div class="mt-5 d-flex justify-content-center">
      <button id="run" class="btn btn-primary">Hello World</button>
    </div>
    <script
      src="https://cdn.jsdelivr.net/npm/bootstrap@5.2.3/dist/js/bootstrap.bundle.min.js"
      integrity="sha384-kenU1KFdBIe4zVF0s0G1M5b4hcpxyD9F7jL+jjXkk+Q2h455rYXK/7HAuoJl+0I4"
      crossorigin="anonymous"
    ></script>
  </body>
</html>
Great work! Now, you can run the command npm start to launch your project and see it in action. This will automatically launch MS Word if it is installed on your system.
In Word, navigate to the Home tab and click the Show Taskpane button in the ribbon to open the add-in task pane. You will then be able to see the “Hello World” button we just created within the task pane.
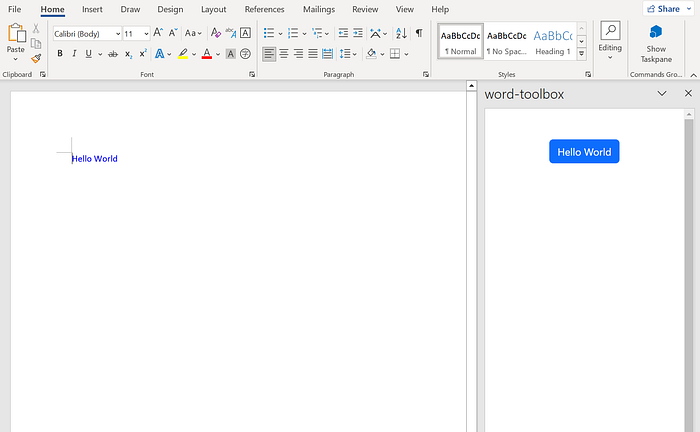
When the “Hello World” button is clicked, taskpane.js listens for the event and calls the run() function, which inserts a Hello World string at the end of the document, changes the font color to blue, and synchronizes the context to ensure the changes are applied to our document.
// taskpane.js

Office.onReady((info) => {
  if (info.host === Office.HostType.Word) {
    document.getElementById("run").onclick = run;
  }
});

export async function run() {
  return Word.run(async (context) => {
    // insert a paragraph at the end of the document.
    const paragraph = context.document.body.insertParagraph("Hello World", Word.InsertLocation.end);

    // change the paragraph color to blue.
    paragraph.font.color = "blue";

    await context.sync();
  });
}
Wrap Up
Great job on completing this tutorial! With Yo Office’s help, we have successfully set up our MS Word Add-in project, and in my opinion, it was surprisingly straightforward. We’ll be adding more features to it in the next tutorial, so stay tuned!
If you enjoy reading tutorials and stories like these and want to support my writing, please consider signing up to become a Medium member.
Level Up Coding
Thanks for being a part of our community! Before you go:
- 👏 Clap for the story and follow the author 👉
- 📰 View more content in the Level Up Coding publication
- 💰 Free coding interview course ⇒ View Course
- 🔔 Follow us: Twitter | LinkedIn | Newsletter
🚀👉 Join the Level Up talent collective and find an amazing job